Leviton 4 Way Switch Wiring Diagram & 3 Way Switch Wiring Diagram & PDF
When using a Leviton 4 way switch wiring diagram and setup, you can control the single light fixture from 3 different locations, while two locations can be operated by using a 3 way switch wiring diagram and setup. In this post you’re going to learn the wiring process for Leviton 4-way switch and 3 way switch setup in the traditional toggle switch configuration or with the modular/ decora. However, the wiring could be a little bit complex but very implementable by keeping proper terminology in consider. Let’s break down the process step by step for clarity.
Assumptions:
- You have a single light fixture (bulb) that you want to control from three locations using traditional toggle switches.
- You’re using standard electrical wiring, where Black wires are live/hot, White wires are neutral, and bare or green wires are ground.
Materials you’ll need:
- Three 3-way toggle switches (labeled A, B)
- One 4-way toggle switch (middle)
- Electrical connecting wires (black, white, and green)
- Wire nuts or other suitable connectors, screwdrivers, wire stripper/cutter.
Leviton 4 way switch wiring diagram:
In the below wiring diagram, one 4-way switch and two 3-way switch is used to control a load (LED bulb) from 3 different location) wiring diagram for older traditional toggle switches.

Leviton 4 Way Switch wiring diagram:
• Begin by attaching one terminal of the Light Bulb to the Common (here marked as “④”) terminal of the 3-way switch labeled ‘A’.
The other terminal of the Bulb should be connected to the Neutral wire (usually White) from the main power supply.• Now, proceed to link the Brass traveler wire labeled “②” from 3-way switch ‘A’ to the Output/Brass terminal of the 4-way switch (middle one).
Similarly, connect the Brass traveler wire “②” from 3-way switch ‘B’ to the Input/Black terminal of the 4-way switch.
• Finally, make a connection between the Black terminal labeled “①” of 3-way switch ‘B’ and the Line Hot/Live wire (typically Black) of the main power supply.
Also check how to wire a 4 Way Switch using modular or decor switches here.
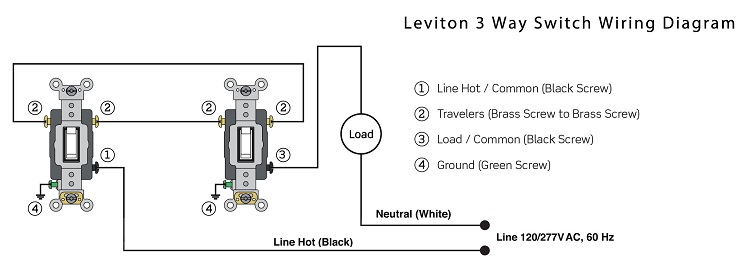
Leviton 3 Way Switch Wiring Diagram:
Connection with Leviton 3 way switch wiring diagram is way simpler than that of 4 way switch as we need to wire only two switches, discussed below in detail.
Assumptions:
• You have a single light fixture(LED bulb) that you want to control from 2 different locations using traditional toggle switches.
• You’re using standard electrical wiring, where Black wires are live/hot, White wires are neutral, and bare or green wires are ground.
Materials you’ll need:
• Two 3-way toggle switches.
• Electrical wires (black, white, and green)
• Wire nuts or other suitable connectors, screwdrivers, wire stripper/cutter.

3 way switch wiring Leviton:
• First, connect any one terminal of Load/ bulb to the Common (Black Screw) of the switch ‘B’. Then connect the 2nd terminal of Load to the Neutral/ (White wire) of the mains supply.
• Now, connect Common (Black screw) from switch ‘A’ to the Line Hot of the mains supply.
• Remaining are the Travelers connections, connect both the Travelers from switch ‘A’ to switch ‘B’. (Brass screw from switch ‘A’ to Brass screw of switch ‘B’)
• Don’t forget to connect the ground screws to the ground cable, commonly colored green.
Download 4 way switch wiring diagram PDF and 3 way switch wiring diagram PDF below.
Author: Alex Voltwell
Note: Leviton here is the trademark of the respective company, this website doesn’t own or claim any kind of copyright regarding the design of the switch.


